Key Takeaways
- Northern Lights is a resilient strain perfect for outdoor growing, even for beginners.
- Choosing a location with ample sunlight and protection from harsh elements is crucial.
- Preparing the soil with the right nutrients sets the stage for a bountiful harvest.
- Regular monitoring and care help in preventing pests and diseases.
- Understanding the right time to harvest and cure your buds ensures top-quality yield.
Embrace the Challenge of Northern Lights
Gardening is more than just a hobby; it’s an adventure. And when it comes to growing cannabis outdoors, there’s no strain that encapsulates the thrill of this journey quite like Northern Lights. This iconic indica is a champion of resilience, offering bountiful rewards to those who are willing to embark on the growing expedition.
Now, let’s roll up our sleeves and dig into the earthy details. Whether you’re a seasoned green thumb or a budding enthusiast, growing Northern Lights outdoors is a journey worth taking.
Why Choose Northern Lights for Your Garden
There are a few good reasons why Northern Lights should be on your gardening radar. Firstly, its hardy nature makes it forgiving to the occasional oversight, which is great news for those who are still learning the ropes. Moreover, its rapid flowering time means you won’t be waiting long to see the fruits of your labor.
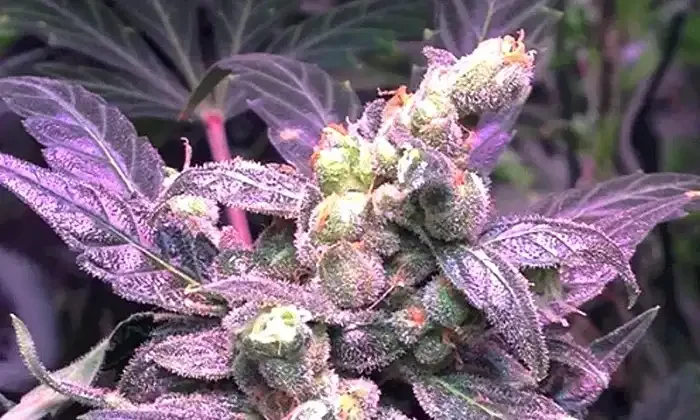
But the real magic happens when the buds come into full bloom. Picture this: dense clusters of resinous buds, each one emitting a sweet, earthy aroma with hints of pine. It’s not just a feast for the eyes; Northern Lights is known for its soothing effects that can help you unwind after a long day in the garden.
Understanding Your Climate’s Suitability
Before we venture further, it’s essential to assess whether your outdoor environment is a good match for Northern Lights. This strain flourishes in a climate similar to the Mediterranean – think long, sun-drenched days followed by cool nights. But don’t fret if your local weather doesn’t fit this description to a tee. Northern Lights is adaptable and can still thrive with a bit of extra care.
Consider the following:
- Daytime temperatures should ideally range between 70-85°F (21-29°C).
- Nighttime temperatures can dip, but sustained cold could hinder growth, so aim for above 50°F (10°C).
- Watch out for high humidity, especially during flowering, as it can lead to mold.
Now that we’ve got a grasp on the climate requirements, let’s prepare for the planting stage.
Preparation is Key
Every successful grow starts with preparation. It’s like setting the stage for a play – everything needs to be in place before the curtains rise. And in the world of gardening, this means ensuring your outdoor space is primed for your Northern Lights plants.
Selecting the Perfect Location
Choosing where to plant is like picking a home for your future buds. You want a spot that’s just right. Here’s what to look for:
- Abundant sunlight: Northern Lights loves the sun, so find a spot that gets at least six hours of direct sunlight a day.
- Shelter from wind: A gentle breeze is beneficial, but strong winds can be harmful, so look for a protected area or consider setting up a windbreak.
- Privacy: Depending on where you live, it’s wise to keep your garden discreet. Look for a secluded spot or use natural screens like tall fences or hedges.
With the location set, it’s time to focus on the foundation of all plant life: the soil.
Soil and Nutrient Essentials
Your soil is the lifeblood of your garden. It feeds your plants, supports their roots, and holds the water they drink. For Northern Lights, you’ll want soil that’s rich in organic matter but also well-draining. Here’s how to achieve that perfect mix:
Start with a high-quality organic potting soil, which will provide a great base. Then, enhance it with some key additions:
- Add compost for a nutrient boost and to improve soil structure.
- Mix in perlite or vermiculite to increase drainage and aeration.
- Include worm castings for a gentle, natural source of essential nutrients.
Remember, healthy soil equals healthy plants. Invest time in preparing your soil, and your Northern Lights will thank you with vigorous growth and potent buds.
Gearing Up for Outdoor Growth
Before you plant those seeds, let’s make sure you have all the gear you’ll need. This isn’t just about shovels and watering cans – it’s about arming yourself with the right tools for every stage of the grow.
Here’s a quick checklist:
- Quality seeds: Source your Northern Lights seeds from a reputable supplier to ensure they’re genetically sound and ready to flourish.
- Watering system: Whether it’s a simple watering can or a more complex drip system, consistent hydration is key.
- Protective netting: This can shield your plants from birds and larger pests while still letting sunlight and rain through.
- pH meter: Keeping your soil’s pH level balanced is crucial for nutrient uptake.
With these preparations in place, you’re nearly ready to start your outdoor grow. But remember, gardening is a marathon, not a sprint. Pace yourself, and enjoy every moment of nurturing your Northern Lights from seedlings to sky-high giants.
The Growing Journey
Imagine your Northern Lights seeds as tiny capsules of potential, just waiting to burst into life. The moment they sprout, the growing journey truly begins. It’s a path filled with anticipation, care, and the joy of watching your plants reach for the sky.
Seeding and Germination Tips
Germination is the first step in your plant’s life, and it’s important to get it right. Start by soaking your Northern Lights seeds in lukewarm water for 24 hours to soften the shell. Next, transfer them to a damp paper towel and place it in a warm, dark area. In a few days, you should see the taproots emerge – a sure sign that it’s time to plant.
When planting, gently place the germinated seed about an inch deep into the soil with the taproot facing down. Cover it lightly with soil, water it with care, and wait for nature to do its magic. Within a week, you’ll witness the birth of new seedlings reaching out to the sun.
Protecting Your Green Giants
“A gardener’s best tool is the knowledge from previous seasons. And with a bit of patience, your garden will look better every year.” – Tasha Tudor
As your Northern Lights plants begin to grow, they’ll need protection from the elements and potential threats. It’s your job to be the guardian of these green giants, ensuring they have everything they need to thrive.
Warding Off Pests and Disease
Pests and diseases can turn a thriving garden into a field of despair if left unchecked. Keep a close eye on your plants for any signs of trouble. If you spot insects or discoloration, act fast. Use natural predators like ladybugs to control aphids, and apply neem oil for a wide range of pests and fungal issues.
Remember, prevention is better than cure. Keep your garden clean, avoid overwatering, and ensure good air circulation around your plants to reduce the risk of disease.
Braving the Weather: Sun, Rain, and Temperature
Northern Lights plants love the sun, but they can get too much of a good thing. If the heat is intense, provide some shade to prevent scorching. Conversely, if rain is frequent, ensure your soil drains well to avoid waterlogging, which can lead to root rot.
As for temperature, while Northern Lights can handle cooler nights, protect your plants from frost. A simple frost cloth can make all the difference in extending your growing season and protecting your plants from sudden temperature drops.
Harvesting and Curing Like a Pro
The time and effort you’ve invested in your garden are about to pay off. Harvesting is the grand finale of the growing process, and doing it right will ensure your Northern Lights are as potent and flavorful as they can be.
Identifying the Optimal Harvest Time
Timing is everything when it comes to harvesting. Wait for the right moment when the trichomes on the buds shift from clear to a milky white, with some turning amber. This is the peak of potency and signals it’s time to harvest.
Use sharp scissors to cut the branches, then trim away the leaves to reveal the beautiful buds. It’s a meticulous process, but the attention to detail will shine through in the final product.
Curing for Potency and Flavor
Curing is like aging a fine wine; it brings out the depth and richness in your buds. Dry your harvest slowly over the course of a week in a dark, well-ventilated space. Then, store the buds in airtight jars, opening them daily to let fresh air in and to check for any signs of mold.
After a few weeks of curing, your Northern Lights will be ready to enjoy. The aroma will be richer, the flavor smoother, and the effects more profound. It’s the reward for your patience and hard work.
Your Growing Legacy
As one growing season ends, another begins. Your experience with Northern Lights outdoors will leave you with not just a harvest of buds, but a harvest of knowledge. Use what you’ve learned to refine your techniques and improve your garden year after year.
Maintaining your plants and expanding your crop will allow you to share your bounty and knowledge with others. And as you do, you’ll become not just a grower of plants, but a grower of community and tradition in the world of gardening.
Maintaining Your Plants for Years to Come
After you’ve enjoyed the fruits of your labor, it’s time to think about the future. Maintaining your Northern Lights plants is about observing, learning, and adapting. Every season will teach you something new. Maybe you’ll learn that your plants prefer more shade, or that they thrive with a certain type of fertilizer. Use this knowledge to tweak your approach and improve each year.
Pruning is a vital part of maintenance. It encourages growth and increases yield. Cut away the dead or overgrown branches, and your plants will reward you with more vigorous growth. Keep an eye out for any signs of disease or pests, even in the off-season, to ensure your plants stay healthy year-round.
Expanding Your Northern Lights Family
Once you’ve mastered the art of growing Northern Lights, why not expand your garden? You can start new plants from seeds or try cloning, which involves taking cuttings from your existing plants. Cloning is a fantastic way to grow an army of Northern Lights plants that maintain the genetic qualities of their parent. Just snip a branch, plant it, and watch as it develops roots of its own.
Frequently Asked Questions
As you embark on this journey, questions will naturally arise. Let’s address some of the most common ones to give you a head start.
Can Northern Lights be grown outdoors in cooler climates?
Yes, Northern Lights can be grown outdoors in cooler climates, but it’s essential to plan your grow season to avoid frost. Start your seeds indoors and transplant them outside when the risk of frost has passed. You can also use a greenhouse or cold frame to extend the growing season.
How long does it usually take for Northern Lights to flower outdoors?
Northern Lights typically takes about 7 to 9 weeks to flower outdoors. However, the exact timing can vary based on your specific climate and growing conditions.
What are the most common issues when growing Northern Lights outside?
The most common issues when growing Northern Lights outside include overwatering, nutrient imbalances, and dealing with pests and diseases. To avoid these problems, ensure proper drainage, monitor soil nutrient levels, and keep a vigilant eye for any signs of infestation or illness.
How often should I water my outdoor Northern Lights plants?
Watering frequency will depend on your climate and weather conditions, but a good rule of thumb is to water when the top inch of soil feels dry. During hot or windy days, your plants may need more frequent watering, while cooler, rainy periods will require less.
Are there specific nutrients that Northern Lights require for optimal growth?
Northern Lights, like most cannabis plants, will thrive with a balanced diet of nitrogen, phosphorus, and potassium. During the vegetative stage, focus on nitrogen-rich nutrients. As the plant enters the flowering stage, phosphorus and potassium become more critical. Additionally, supplementing with calcium, magnesium, and trace elements can support overall plant health and bud production.
And with that, you’re ready to grow Northern Lights outdoors. Remember, gardening is a journey, and each plant is a new chapter. So, get your hands dirty, breathe in the fresh air, and relish the joy of growing. If you’re ready to start this adventure and need quality seeds to get going, check out this great option for first-time outdoor growers.
Happy Growing!